sebalele
Member

 Offline Offline
Age: 59
Location: Italy - Milano
Posts: 73
Gabriele
|
 |
« Reply #15 on: April 16, 2015, 11:29:52 PM » |
|
A watch repairer, who does older, mechanical type of wristwatches may be able to help.
Regards,
This could be an idea ... each year visit him for a present to my wife .. He MUST help me !  |
|
|
|
|
 Logged
|
|
|
|
sebalele
Member
Offline
Age: 59
Location: Italy - Milano
Posts: 73
Gabriele
|
|
« Reply #16 on: April 16, 2015, 11:32:00 PM » |
|
I have a spare SME collet in my spare box. Let me know if you are interested.
Thanks , very kind .For now I'll fight to save this but if I'll lose .... |
|
|
|
|
Logged
|
|
|
|
TickOver
Member
Offline
Age: 56
Location: Wales
Posts: 432
|
|
« Reply #17 on: April 17, 2015, 04:53:00 PM » |
|
The major dismeter of a 8ba(sounds small) thread is 2.2mm
A new metric thread will be easiest.
The tap drill for a m3 thread is 2.5mm. This will clear out the old ba thread nicely.
The 3/16 you mention is refering to the bolt length. Its Approximately 4.8mm(again sounds small)
have you tapped a hole before?
Cheers
|
|
|
|
« Last Edit: April 17, 2015, 05:20:42 PM by TickOver »
|
Logged
|
|
|
|
jls001
Member
Offline
Location: Mumbai, India
Posts: 79
|
|
« Reply #18 on: April 17, 2015, 07:09:43 PM » |
|
Tapping larger thread seems like the best solution. If you practice on a scrape hole, you will quickly get the hang of it. The trick is to hold the tap as straight as possible when making thread.
|
|
|
|
|
Logged
|
Joshua
-------
"Pay no attention to what critics say. No statue has ever been put up to a critic." - Jean Sibelius
|
|
|
sebalele
Member
Offline
Age: 59
Location: Italy - Milano
Posts: 73
Gabriele
|
|
« Reply #19 on: April 17, 2015, 09:11:57 PM » |
|
The major dismeter of a 8ba(sounds small) thread is 2.2mm
A new metric thread will be easiest.
The tap drill for a m3 thread is 2.5mm. This will clear out the old ba thread nicely.
The 3/16 you mention is refering to the bolt length. Its Approximately 4.8mm(again sounds small)
have you tapped a hole before?
Cheers
OK tapering for m3 . I really don't know about 3/16 , it's appear on sme part list could be the head bolt diameter..?
I've tapered small alluminium part and even bike bottom bracket .
I've some tapered tools screw ,they are in set of 3 for any thread; I hope having the right one ..
The trick is to hold the tap as straight as possible when making thread.
With the help/guide of old thread I think to go straight .. many thanks ! See soon |
|
|
|
|
Logged
|
|
|
|
sebalele
Member
Offline
Age: 59
Location: Italy - Milano
Posts: 73
Gabriele
|
|
« Reply #20 on: April 22, 2015, 03:00:07 PM » |
|
I've got this arm on hands and thinking to rewiring with new one . I will replace new wires in the wand and out of the pillar I'll solder 100 cm of balance microphonic shielded cable . I use TASKAR C128 ,these are very low capacitance and flexible . Shield from the cable will be solder with the - of each channel only on the arm side . This configuration works in all my phono system : not hum at all and good sonic result . Go straight with wires from headshell is an option but , need to use the same thin(and delicate) cable till the preaplifier .I prefer join a solder in between .Anyway an improved (at least elettrical ) will be : jumping the old sme connector and using news wire / cable . I take a tour in ebay and results show cardas or lits wire kits from 6 to15 pound . Some of them are shielded . So I ask .. if are there the right item (28/32/33 awg ?) ? any other wire suggestion ? Can I use in the wand a shielded cable ? or it will be too big and the arm will suffer from free moviment ? This what I'm going to have (from internet) :  many thanks for cons . Ciao |
|
|
|
|
Logged
|
|
|
|
wer
Member
 Offline
Location: Catalunya
Posts: 9,281
|
|
« Reply #21 on: April 22, 2015, 08:08:23 PM » |
|
Can I use in the wand a shielded cable ? or it will be too big and the arm will suffer from free moviment ?
There is not much to gain from using shielded cable inside the arm tube. The tube itself should be shield enough, and the shielding makes the wiring heavy and less pliable. This is particularly problematic when going from the arm tube into the pillar. |
|
|
|
|
Logged
|
Werner (wer - just my initials, not a nick!)
No esoteric audio equipment (except for my wife)
|
|
|
sebalele
Member
Offline
Age: 59
Location: Italy - Milano
Posts: 73
Gabriele
|
|
« Reply #22 on: May 03, 2015, 03:39:16 PM » |
|
Hi , rewiring has been done , 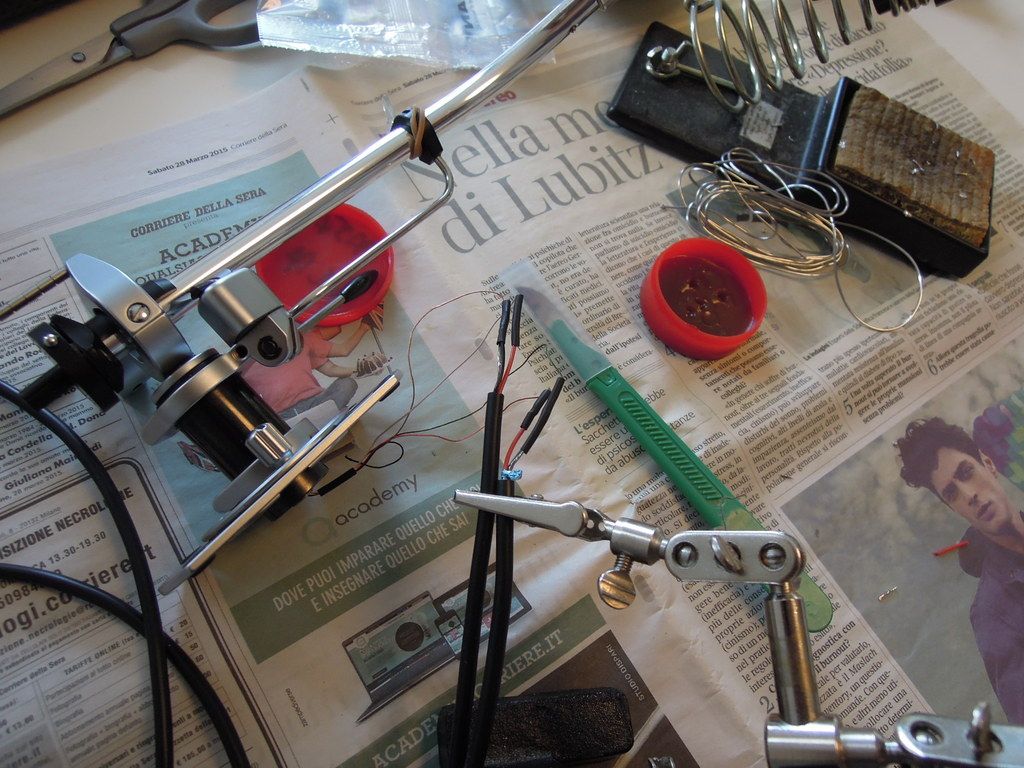 But someone , tell me : NO , NO ! this is not right !  I have some difficult to insert the shell . One pin in the headshell socket don't spring out . It's steady ! Tried with no much care to revive it but it's has been melted with the plastic.... I've take so much care in soldering the thin wire but it's happen !  Now , reading around others say to put the complete cartridge + shell before soldering this will act as heat sink . I'm using a 50 w iron from weller but better 10/15 W . No way to refit , it's strongly firm .if you push the pin go out on the other side . No spring effect . SME original part it's expensive , I've found an cartridge socket from a technics arm on 1210/1200 TT . I 've not tried yet , I'm not sure about internal size compatibility . Someone did to change the original sme socket with others ? Still on as I can Best Sunday |
|
|
|
|
Logged
|
|
|
|
needlekiller
Member
Offline
Age: 73
Location: germany, near cologne
Posts: 526
|
|
« Reply #23 on: May 04, 2015, 07:00:37 PM » |
|
little hint for soldering small pieces, i use soldering-liquid for tiffany-lamps pieces. it cleans the surface and the soldering-time is very short!
|
|
|
|
|
Logged
|
uli
I dissociate myself hereby expressly from all ironic posts that I write and all
Misinterpretations that may arise due to lack of understanding of others!
|
|
|
ropie
Administrator
Member
 Offline
Posts: 12,313

|
|
« Reply #24 on: May 04, 2015, 10:45:31 PM » |
|
Try spraying some WD40 on the stiff pin and work it in and out a few times to see if that loosens it.
|
|
|
|
|
Logged
|
|
|
|
Rotsch
Member
Offline
Age: 60
Location: Germany "@the lost west"
Posts: 3,531
Follow the white rabbit.....
|
|
« Reply #25 on: May 05, 2015, 01:11:53 AM » |
|
|
|
|
|
|
Logged
|
Roger  "To play a wrong note is insignificant. To play without passion is inexcusable." "To play a wrong note is insignificant. To play without passion is inexcusable." -Ludwig Van Beethoven
|
|
|
sebalele
Member
Offline
Age: 59
Location: Italy - Milano
Posts: 73
Gabriele
|
|
« Reply #26 on: May 09, 2015, 08:43:17 PM » |
|
Hello friends , some news .. I've put the socket in crc for a night but no way , the spring is well melted and doesn't work . Original replacement has a immoral cost so I go for technics 1200 arm socket .  I found that this socket is better then original SME . Sometime when use different shell (not sme marked) doesn't fit like butter but need extra strong force to install . Luckily the technics socket fit the sme wand , there is a little gap , I think 1/10 mm so I put a little shim to avoid easy rotation . Better than having a bigger diameter . The hole for screwing fall exactly in same place ; SME use 2 screw , 1 is enough   To prevent same mistake , I've use a medical scissor and the headshell as heatsink .  I've soldered all pins , cable and rca connector . Next days I'm going to fix the cable throught P-clamp and some hardware then let's go for TEST ! Hope this note could help other friends . See soon Gabriele this is a little shim from battery holder |
|
|
|
|
Logged
|
|
|
|
wer
Member
Offline
Location: Catalunya
Posts: 9,281
|
|
« Reply #27 on: May 10, 2015, 11:47:40 AM » |
|
The hole for screwing fall exactly in same place ; SME use 2 screw , 1 is enough Once you have found the correct orientation ofthe headshell, you might try to make a little insert from 1mm Al to fit the oval hole in the arm and with a hole for the screw in the correct position. With that your coupling will be held solidly in the arm tube. A fiddly job, but well worth it imho. Suggest you make the hole for the screw first, then file or grind the oval shape  |
|
|
|
|
Logged
|
Werner (wer - just my initials, not a nick!)
No esoteric audio equipment (except for my wife)
|
|
|
sebalele
Member
Offline
Age: 59
Location: Italy - Milano
Posts: 73
Gabriele
|
|
« Reply #28 on: May 10, 2015, 03:39:57 PM » |
|
Once you have found the correct orientation ofthe headshell, you might try to make a little insert from 1mm Al to fit the oval hole in the arm and with a hole for the screw in the correct position. With that your coupling will be held solidly in the arm tube. A fiddly job, but well worth it imho. Suggest you make the hole for the screw first, then file or grind the oval shape Ciao werner , if I got it right , you suggest to fill the oval hole with a same sharp piece of Alu . But in this way don't we loose the lateral adj ? Or you suggest this to avoid the shell to turn and improve rigidity of arm with headshell . With the hint of the shim you look in the image the rotation is more firmly and need more strenght (relativity..) to turn . maybe I have not understood... any suggestion is welcome Thanks , Gabriele |
|
|
|
|
Logged
|
|
|
|
wer
Member
Offline
Location: Catalunya
Posts: 9,281
|
|
« Reply #29 on: May 11, 2015, 09:18:42 AM » |
|
Hi Gabriele, you may find that even after tightening the little screw you can still twist the headshell in the armtube. What i suggested was meant to avoid this possibility. Of course you would lose the possibility of adjustment, bit once you have the correct orientation there should not be any need to change it.
|
|
|
|
|
Logged
|
Werner (wer - just my initials, not a nick!)
No esoteric audio equipment (except for my wife)
|
|
|
|

