Carl
Member
 
 Offline Offline
Location: uk
Posts: 114
|
 |
« on: March 20, 2009, 10:53:06 AM » |
|
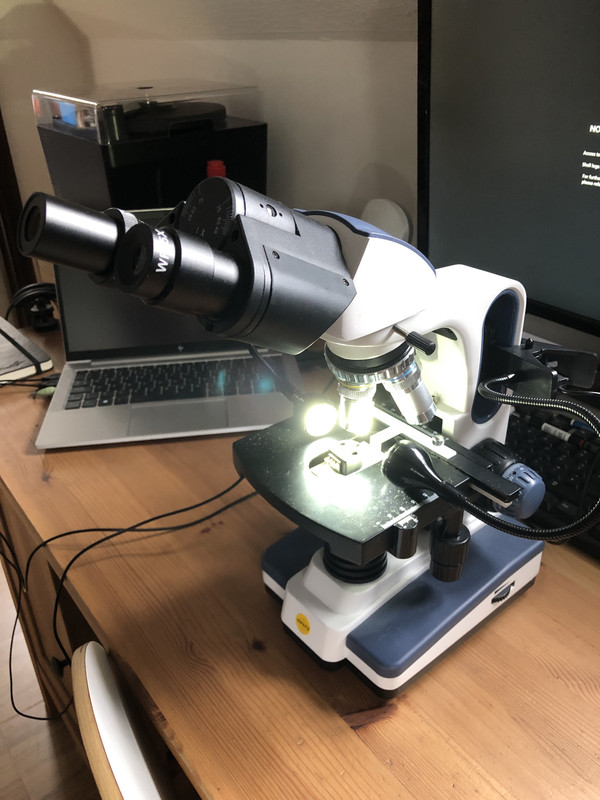
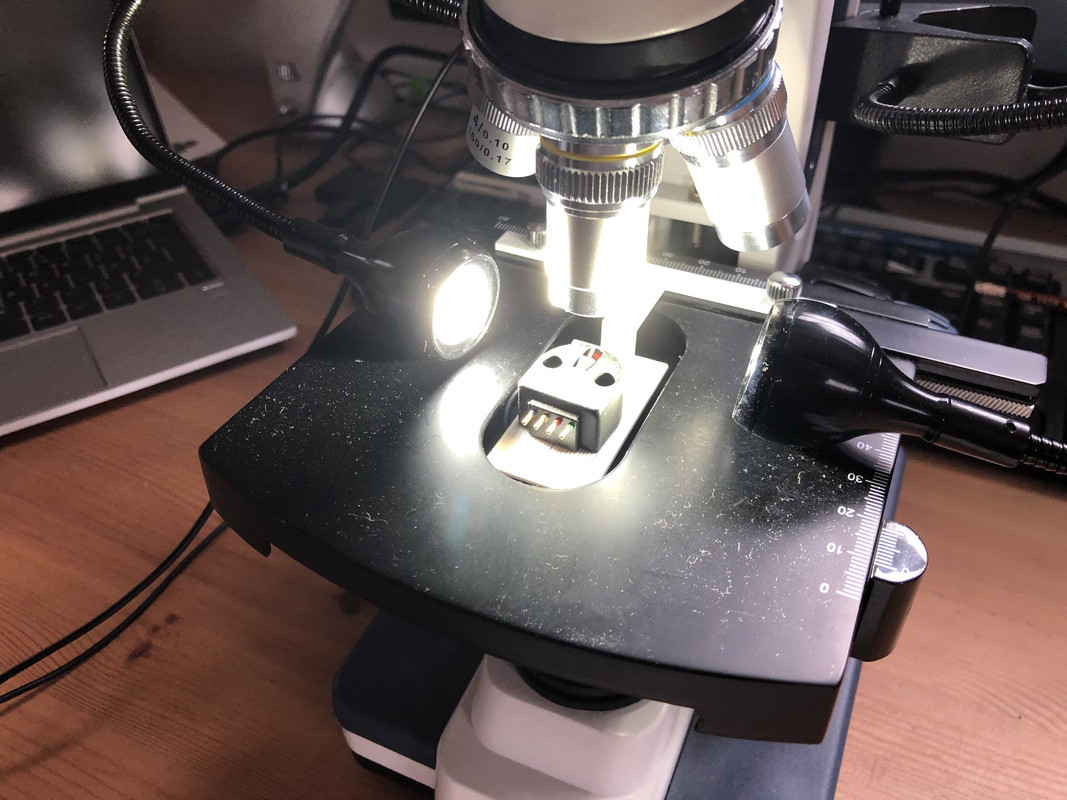
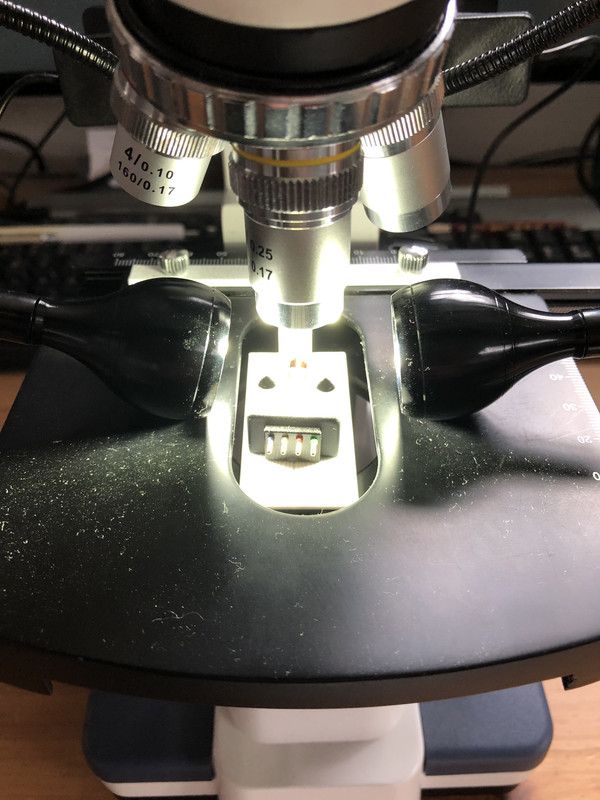
After a discussion with Expert Stylus I decided to find a microscope to have a look at some of my cartridges. Luckily I found some ideal scopes, yards from my desk, hidden in a dark lab I hadn't noticed before! I examined all my carts and it was very informative. Although its very hard to see even under a microscope at 30x magnification, you can just see small amounts of wear on the leading edges of the tips of those that are mistracking my test record. Its oh so subtle though and you need to manipulate the cartridge in your fingers to try to catch the light reflecting on the worn part. It made me think that all those nice pictures of cartridge tips you sometimes see on ebay sales of used cartridges are meaningless and useless. I attempted to take pictures of the diamonds but I never succeeded in taking a useful photo or the worn part. The wear is so small that can result in mistracking that you'd never notice it on such a picture. It was really fascinating observing the tip shapes of my various carts and noting the differences in the elipticals on some of my pickering MM's to some of the more advanced shapes on the MC's. So the results of the test record and the looksee under the scope make it clear to me which carts need retipping and which are still ok. This paper on the net was super informative and helpful to identify what I needed to look for: http://www.micrographia.com/projec/projapps/viny/viny0000.htm---------------------------------------------------------------------------------------------------------------------------------- (Edited 18/6/2024) Seems a very long time ago since I started this thread. I don't drop by LH often these days but I thought I'd update where I am at with cartridge inspection and my current setup. I tried a few USB setups without much success but a few years ago I decided to buy an optical microscope.  I settled on a Swift model 350B which was quite reasonably priced and modified the deck plate to take a cartridge by removing some of the unnecessary parts that would be used for viewing slides underneath. https://www.amazon.co.uk/SW350B-Magnification-Siedentopf-Research-Grade-Microscope/dp/B07N7QVF3JPreviously I just had a little bit of plastic sat in the recess that I would move about with my finger but recently a friend 3D printed me a little holder which allows the X and Y fine controls to be used to find the diamond tip.   I use these LED lights from eBay and just clip them to the rear handle on the microscope. They are really handy because you can move them about to find really good reflections of the wear patches and they are particularly useful when viewing the tip from different angles. https://www.ebay.co.uk/itm/354652145973?var=624016632255  The main objective I use is 10x and I use both 10x and 25x eyepieces for 100x and 250x overall magnification. I use the 100x for dialling in and 250x for closer inspection.   Its a simple and very easy to use setup and it gets very good results. For pics and video's I just hold up my iPhone to the eyepiece which seems to be good enough for keeping track of wear. Here's a few pictures.    If you have a lot of cartridges, like I do, then it's essential to be able to do this. Anything that's needed a retip goes to our very own Joseph (Groovetickler) who does an awesome job every time. |
|
|
|
« Last Edit: October 20, 2024, 11:27:19 AM by Carl »
|
 Logged
|
Living in a hifi theme park...
|
|
|
reinderspeter
Administrator
Member

 Offline Offline
Age: 61
Location: Amsterdam
Posts: 6,663

|
 |
« Reply #1 on: March 20, 2009, 11:11:13 AM » |
|
Great link  |
|
|
|
|
 Logged
|
Peter PTP Audio for Lenco based idler drive Turntables, Chipamps and Power Controllers. |
|
|
Ulf
Member
  
 Offline Offline
Age: 69
Location: Ljungdalen - Sweden
Posts: 388
|
 |
« Reply #2 on: March 20, 2009, 01:59:11 PM » |
|
Agree, very interesting.
,,,Ulf
|
|
|
|
|
 Logged
|
|
|
|
daiwok
Member

 Offline Offline
Age: 54
Location: HONG KONG
Posts: 7,557
|
 |
« Reply #3 on: March 20, 2009, 02:55:13 PM » |
|
Great Link Carl, I think this deserves to be a Sticky !!  |
|
|
|
|
 Logged
|
David  Vinyl is BLACK MAGIC |
|
|
|
jon
|
 |
« Reply #4 on: March 20, 2009, 09:36:35 PM » |
|
Wonderful article.
Thank you for highlighting it!
|
|
|
|
|
 Logged
|
Please let me build a system that is a bit forgiving on what I find in thrift shops for a handful of pennies and still is able to deliver the goods on good pressings.
(Syncopeter)
|
|
|
richard
Member

 Offline Offline
Location: Southeast Tennessee, USA
Posts: 7,798
|
 |
« Reply #5 on: March 21, 2009, 04:48:28 AM » |
|
Very nice. Thank you, Carl.
I see that I need to learn more about lighting and stands. I've been using the Mattel-Intel computer microscope recently. It's both useful and very maddening. Mattel sold this off to another company, and I've forgotten its present name -- Digital Blue? Maximum magnification is 200x which is soft-of OK, but doesn't show me enough of the contact points. I'm scheming to do an ugly hack job of the worthless blue deco shroud which might permit me to add an auxilliary lens.
The supplied stand is frustrating because it moves in jerks, and those jerks bounce the specimen out-of-position. The software, which is required in order to operate the thing, is some of the most stupid, user-hostile programming that I've ever experienced. However, it does work. The new company has not improved the vile software, which makes ugly stupid sound effects with every mouse operation (and mousing is what it is because the programmers didn't believe in keyboards). The only practical way to kill these sounds is by turning off all the computer's sound before loading the microscope program because the program takes over the entire screen.
Now that I've complained enough, I like the essential microscope. It's been useful to me in sorting through styli. The most useful lighting for me has been the lamp that's built into the base. This produces a shadow view of the tip. The only useful view for me has been head-on (or reverse) which shows both contact points.
I disagree with the writer about elliptical styli. In general, he's right about reduced wear, in the sense that a new elliptical tip will trace difficult, complex musical signals better. But the elliptical tip wears out quicker because the contact patch is smaller relative to the conical of the same bearing radius. The newer (and more expensive) parabolic-type stylus gives the benefits of both profiles with its elongated-ellipse shape.
His method of polishing a new needle is good (but he doesn't explain why--it's good to do this with "ordinary" tips; this is a trick told to me by a cartridge engineer). I do this myself. I liked his method of verifying antiskating setting by tapping the turntable chassis: very good; I'll try it.
How useful is microscope inspection? It's good for sorting and culling out needles that are obviously shot. But in reality, I don't really trust it. Many years ago, a stylus manufacturer under contract to Columbia Records noticed that women who inspected records at the pressing plant could actually hear diamond wear well before that wear was visible under the microscope.
I especially like his photos of mistracking damage in the grooves. Now, that's sobering.
|
|
|
|
|
 Logged
|
Richard Steinfeld
Author of The Handbook for Stanton and Pickering Phonograph Cartridges and Styli.
|
|
|
|
brian
Guest
|
 |
« Reply #6 on: March 21, 2009, 08:14:39 AM » |
|
I liked his method of verifying antiskating setting by tapping the turntable chassis: very good; I'll try it. Where is that mentioned in the article Richard? I can't find it :  |
|
|
|
|
 Logged
|
|
|
|
richard
Member

 Offline Offline
Location: Southeast Tennessee, USA
Posts: 7,798
|
 |
« Reply #7 on: March 21, 2009, 10:22:34 AM » |
|
I think that the writer's antiskate method was mentioned in conjunction with a specific stereo test record, maybe on P.3 of the article. The record appears to be unusually useful because a specific tone is offered at two points on the record side in order to verify the setting in the inner groove area. I don't have this on any of my various test records.
Of course, as the years pass by, mono test records become harder and harder to find. As you know, I value antiskating for mono playback in order to extend record and stylus life by equalizing the wear. It can also allow us to obtain a small gain in tracking force, too, which can, in turn, improve stylus and record life. With certain cartridges, antiskating can improve tracking by keeping the cantilever better-centered. I've never seen these factors considered by hi-fi writers whom I've read. When it comes to record damage, I like to do everything that can help within reason and our mental stability (this is the sanity clause.)
|
|
|
|
|
 Logged
|
Richard Steinfeld
Author of The Handbook for Stanton and Pickering Phonograph Cartridges and Styli.
|
|
|
|
brian
Guest
|
 |
« Reply #8 on: March 21, 2009, 10:57:30 AM » |
|
I've come round to this now that I'm using a series-connected light tracking stereo cart with 0.5mil diamond for most of my vinyl.
I know have the original ant-skate doo-dah for my Series I 3012. It has a tag missing so I will have to glue it on.
|
|
|
|
|
 Logged
|
|
|
|
richard
Member

 Offline Offline
Location: Southeast Tennessee, USA
Posts: 7,798
|
 |
« Reply #9 on: June 06, 2009, 08:42:23 AM » |
|
Even though I've written about this elsewhere, I'll mention this here again: my use of the Intel/Mattel microscope has been improved greatly by replacing its god-awful bundled software with IrfanView, a wonderful free image manipulation program. The microscope actually has a standard TWAIN imaging interface. The firmware built into the microscope is better than how the manufacturer's own software relates with that firmware; IrfanView (and other TWAIN-capable programs) connect directly to the microscope.
This microscope is now being marketed by Digital Blue and comes with the identical grotty bundled software. The only difference in the product is that its built-in lights have been changed from tiny bulbs to LEDs.
|
|
|
|
|
 Logged
|
Richard Steinfeld
Author of The Handbook for Stanton and Pickering Phonograph Cartridges and Styli.
|
|
|
|
markse
Guest
|
 |
« Reply #10 on: July 25, 2010, 01:23:21 PM » |
|
-
|
|
|
|
« Last Edit: August 24, 2010, 08:48:58 AM by markse »
|
 Logged
|
|
|
|
richard
Member

 Offline Offline
Location: Southeast Tennessee, USA
Posts: 7,798
|
 |
« Reply #11 on: July 25, 2010, 07:28:07 PM » |
|
Thank you, Mark.
I'd appreciate your going into some detail about the microscopes you're talking about. I've tried (low-priced) microscopes for this. but have had variable results. I understand that you're talking about professional-quality instruments.
The Intel/Mattel/Blue Coral/(another European barnd I've forgotten) needs some understanding in order to obtain decent results. First is the fact that the microscope will "interpolate" automatically when there's not enough light. This is the most important reason for abandoning the software that's provided with the microscope. I've tried many computer programs for various purposes, and the program that comes with this microscope is among the worst that I've ever encountered.
We're in luck because the microscope has adequate controls built into itself (and bypassed by the software). Its output uses the standard TWAIN sofware interface. Thus, one can get much better control using this microscope with the free Windows program IrfanView, or any other reasonable image tool.
I like to be able to save images of needle tips. However, microscopes have proved to be limited in evaluating stylus wear and how this affects record wear and even listening. They are useful in determining gross damage. I'm of the opinion that when I can see any flatting (or other defect), the needle has already been wearing records abnormally.
At some time during the 70s, Arnold Schwartz, the mastermind behind Micro-Acoustics cartridges, published a short monograph in which he reported that quality inspectors at Columbia's pressing plant could actually hear stylus wear before he could see that wear under his microscope. This report has special significance. Schwartz not only made needles for his own cartridges, he also made cutting styli. This gave Schwartz insights into stylus shapes, stylus wear, and record wear, far beyond that of the typical cartridge manufacturer, who often didn't even make their own styli, let alone finish their own diamonds for them.
Stanton, having been a true engineering-driven company at the time, had their own electron scanning-beam micscope. I have a few photos from it, of tips, and especially, of record grooves. The groove damage is quite visible: these photos are sobering.
So, in general, my own method of estimating stylus wear is by time in service. There are other things that I look for. too, when evaluating a needle's history.
|
|
|
|
|
 Logged
|
Richard Steinfeld
Author of The Handbook for Stanton and Pickering Phonograph Cartridges and Styli.
|
|
|
wer
Member

 Offline Offline
Location: Catalunya
Posts: 9,357
|
 |
« Reply #12 on: July 25, 2010, 08:03:45 PM » |
|
Hi Richard,
Possibly you are a bit too pessimistic about evaluating stylus wear under the microscope. I first bought a fairly cheap one on fleabay, but could not get a useable magnification with the lenses provided, so i bought another one -somewhat more expensive (about $ 80)- which gives me a reasonable depth of field at 80x and allows me to use an LED flashlight from either side. Starting off with about 20 styli old and new i finally found the proper way of illumination to show those elusive reflection spots in case of worn diamonds, and by now it only takes me about 5 min to judge a stylus.
|
|
|
|
|
 Logged
|
Werner (wer - just my initials, not a nick!)
No esoteric audio equipment (except for my wife)
|
|
|
|
markse
Guest
|
 |
« Reply #13 on: July 25, 2010, 08:23:58 PM » |
|
-
|
|
|
|
« Last Edit: August 24, 2010, 08:49:13 AM by markse »
|
 Logged
|
|
|
|
martinhall
Member

 Offline Offline
Age: 83
Location: Berkshire
Posts: 49

|
 |
« Reply #14 on: February 11, 2012, 07:41:09 PM » |
|
 I'd say that a microscope is extremly usefull for checking the whole cartridge mech, but it has to have good optics, this is more important than the magnification and you only need enough of that to see the sphere of the stylus tip, (provided the optics are up to that!). If you can see the sphere, you can see also the ground flats at front and rear of the sphere formong the so called eliptical tip. Really it is bi-radial. These are the most commonly produced styli*. If you can see all of this in your 'scope, then you will be able to see if there are flats in the areas of contact, `wear' flats. Even checking if the diamond is still fastened into the cantilever correctly and see if there is any damage to the cantilever itself. Then you may be able to check the suspension block, if you can see enough of it that is. With all of this you'll need some lighting to assist you view, a small double celled maglite is my choice and my scope? A small upright brass and iron victorian jobbie of uncertain vintage, left me by my late father and it does the job a treat. * There are of course, more exotic styli that conform more closely to the ideal and these are just as easily viewed.
|
|
|
|
« Last Edit: February 11, 2012, 07:43:41 PM by martinhall »
|
 Logged
|
and you run and you run to catch up with the sun, but it's sinking, racing around to come up behind you again........
the sun is the same in the relative way, but you're older, shorter of breath and one day closer to death......... Wish you were here.
|
|
|
|


